This article assumes that you are familiar with the concepts like memorymanagement, ARC and retain cycle.
If you want to know more on the memory management and retain cycle, please have a look at my introductory blog on memory management : iOS Memory Management – Introduction
From the previous blog, we got to know that in case of a retain cycle or a memory leak, ARC will not deallocate the memory for the object since the objects are not deinitialized.
Memory leak adversely affect the performance of the app and sometimes it lead to an app crash.
In this blog, let us create a memory leak and troubleshoot it in xcode debug memory navigator.
Step 1:
Open xcode and create a new iOS project. You could see the Main storyboard and ViewController class by default.
Embed the ViewController in a navigation controller. Also drag and drop a new View Controller into the storyboard.
Now add a new View Controller cocoa touch class and name it as SecondVCViewController. Set the name of the newly added View Controller in the Main Storyboard to SecondVCViewController.
Add a UIButton to the center of the ViewController and a UILabel to the center of the Second View Controller.
After adding the second view controller, button and label, the UI should look like below
1. View Controllers
Step 2:
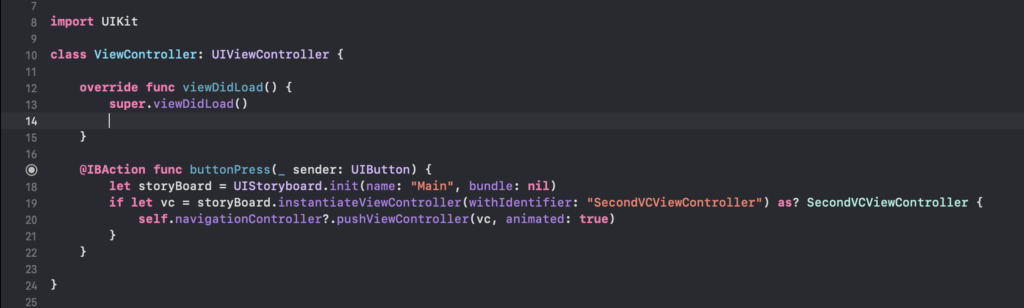
Now add an IBAction from the button to the View Controller. In the button method, create an instance of SecondViewController and push it to the navigation stack as shown below
2. Button Action
Step 3:
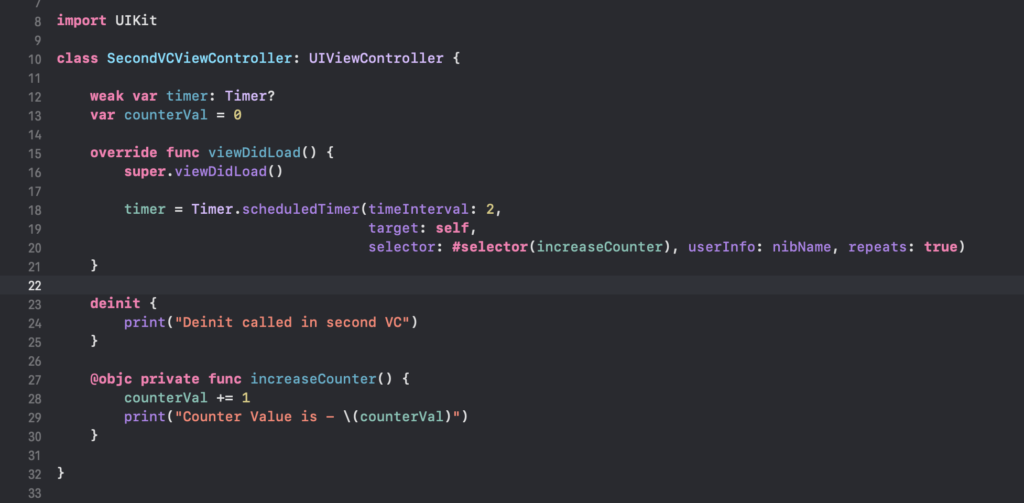
Add the below code to the SecondVCViewController as below.
3. Second View Controller
As we can see above, Second View Controller has a timer and also a counter variable. Timer is started in the viewDidLoad method. The counter variable is incremented every 2 seconds in the selector method.
Note: The timer is not invalidated here.
Step 4:
Now we have everything setup to navigate from View Controller to SecondVCViewController on click of the button in View Controller.
Now run the project in a simulator. You will see the View Controller as shown below.
4. First View Controller
Step 5:
We could see the debug tab at the bottom as shown below.
5. Memory Debug
Step 6:
Clicking on the memory debug option, we get the memory debug navigator as shown below.
6. Debug Memory Navigator
Step 7:
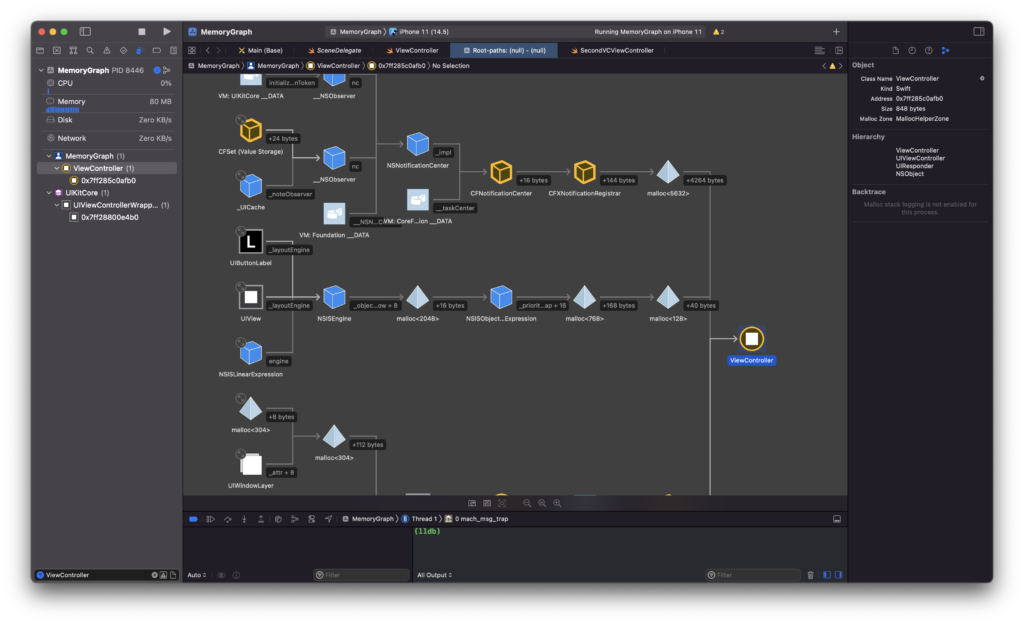
Click on the ViewController in the debug navigator. We get the Memory Graph as shown below.
7. Memory Graph
Step 8:
Click the Debug Memory Graph option again as shown in the step 5 to continue running the application.
Click on the button in the View Controller and make sure the SecondVCViewController is pushed to the navigation stack. The UI of the SecondVCViewController should be as shown below.
8. SecondVCViewController
Once the SecondVCViewController is loaded, the timer is started. The counter is also incremented every 2 seconds. Timer has the target set to self and is a repeating timer. This will lead to a retain cycle if the timer is not invalidated.
We can see the counter value getting incremented every 2 seconds in the console logs as shown below:
8.1. Counter Incremented
Now click on the debug memory graph as shown in the step 5 and you would get the memory as below.
8.2. SecondVCViewController memory graph
Observe that the SecondVCViewController has (1) object
in memory.
Step 9:
Now click the back button in the SecondVCViewController to pop out of the navigation stack. Make sure it moves from SecondVCViewController to first View Controller.
But interestingly, because of the retain count, the SecondVCViewController is not deinitialized and the counter will keep on incrementing the value.
If we navigate to the SecondVCViewController three times, we could see that there will be three instances of the SecondVCViewController object in the memory. This is shown in the Debug Memory Graph as below:
9. Three instances of SecondVCViewController
This is called a Memory leak
Fixing memory leak:
To mitigate the retain cycle, add a timer?.invalidate() inside viewDidDisappear method in SecondVCViewController as shown below.
invalidate timer in viewDidDisappear
Now run the Project. Press the button in the View Controller, navigate to SecondVCViewController. Click the back button and come back to the first View Controller.
Now you can see that there is no retain count and the SecondVCViewController is deinitialized successfully as shown below: